I am totally in love with houses that have "character".
We are slowly trying to add elements to our house that add some charm.
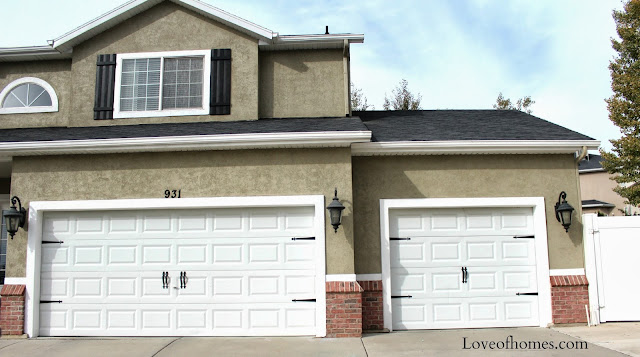
We've changed our lighting, painted the exterior & added wood shutters. I think all of the changes have made a huge difference.
You can see the first set of changes HERE.
I've been wanting to add some hardware to our garage doors for a while now.
Our doors are actually kind of old & when we were at Home Depot the other night, we decided to get some pricing for new ones.
You can see the first set of changes HERE.
I've been wanting to add some hardware to our garage doors for a while now.
Our doors are actually kind of old & when we were at Home Depot the other night, we decided to get some pricing for new ones.
I am totally in LOVE with the carriage garage doors!
Unfortunately, they are not in our budget right now & they can be REALLY expensive!
Unfortunately, they are not in our budget right now & they can be REALLY expensive!


Aren't they charming??
Well considering we have plenty of other projects that I'd like to save our money for (Like a white kitchen!)
We decided to just buy the hardware and at $12.50 a package, It's a cheap way to add some charm!
blog.jpg)
We had to buy two packages to fit both of our doors.
My husband & boys started on the third car garage & I was SO excited with how it was looking...
blog2.jpg) Charming wouldn't you say?
Charming wouldn't you say?
blog2.jpg)
It was just the look I was hoping for!
Then we got to the main garage door & there was a problem...it actually had a thinner width in the middle part of the door for the handles.
They both wouldn't fit side by side like the other door!!
The only choice we had was to place them spaced apart & we couldn't change the 3rd car garage door to match because we had already drilled the holes in the middle.
blog2.jpg) My husband says it's fine because they are two different sized doors.
My husband says it's fine because they are two different sized doors.
They both wouldn't fit side by side like the other door!!
The only choice we had was to place them spaced apart & we couldn't change the 3rd car garage door to match because we had already drilled the holes in the middle.
blog2.jpg)
I'm still not sure.
I think they are a terrific & cheap way to add some character, but if you have two doors always make sure they are actually the same size before you start!
****UPDATE
It drove me crazy to have the doors look so different!
It's only a year later, but I did figure out how to fix my doors!
 I bought one more package of door hardware & moved the handles in.
I decided to place two sets of double handles closer together like the other door. We filled the holes in with screws & painted them white...you hardly notice them at all.
 They definitely match better now!
I'm sharing with these blogs:
The 36th Avenue
Fine Craft Guild
Fireflies & Jellybeans
Kristen's Creations
Redoux
Chic On A Shoestring
Tatertots & Jello
Craftomaniac
Making The World Cuter
Cherished Bliss
My Uncommon Slice Of Suburbia
The Sasse Life
Finding Fabulous
Skip To My Lou
Thrifty Decor Chick
Beneath My Heart
I Heart Nap Time
Organize & Decorate Everything
It drove me crazy to have the doors look so different!
It's only a year later, but I did figure out how to fix my doors!
 I bought one more package of door hardware & moved the handles in.
 I decided to place two sets of double handles closer together like the other door. We filled the holes in with screws & painted them white...you hardly notice them at all.
 They definitely match better now!
I'm sharing with these blogs:
The 36th Avenue
Fine Craft Guild
Fireflies & Jellybeans
Kristen's Creations
Redoux
Chic On A Shoestring
Tatertots & Jello
Craftomaniac
Making The World Cuter
Cherished Bliss
My Uncommon Slice Of Suburbia
The Sasse Life
Finding Fabulous
Skip To My Lou
Thrifty Decor Chick
Beneath My Heart
I Heart Nap Time
Organize & Decorate Everything


blog.jpg)