Thursday, May 17, 2012

Freaktastic Furniture Challenge


Mandi at Vintage Revivals is having a challenge on her blog today.  The challenge is  to buy a piece of furniture for your house  that kind of scares you a little.  Last summer, was the first time I started buying used furniture & painting it.  It is a little scary!  

This is the beauty I took a risk on....
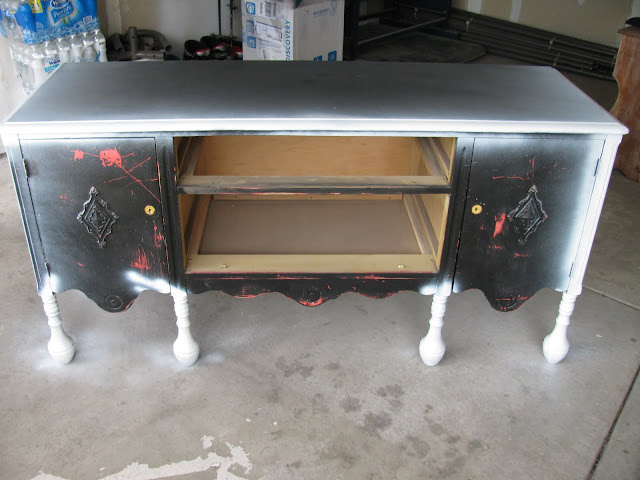
It was unique & I loved the shape of the legs!
It was only $20! So I figured even if it didn't work, It wasn't a huge risk!
We cleaned it, sanded, & wiped on liquid sander over the whole piece.  Next, we primed it & covered it with a few coats of white spray paint. Then we just spray painted the hardware that was already on it & put them back on & it was all done!  
Here it is now!
It turned out perfect for my daughter's bedroom!
You can see more of her room HERE.
It was a risk that I'm so glad we took! 
Since then I've purchased quite a few pieces of cheap furniture & refinished them...it's a lot of fun!!

Stop by Mandi's blog Vintage Revivals & check out the cool couch she is taking a risk on!

Wednesday, May 16, 2012

Rent Textbooks & Help Operation Smile


For my readers who are currently going to college, have kids in college or maybe you know someone that will be starting school next fall,  I have found a wonderful company that might be of interest to you. 
 It's a great place to "rent" your textbooks!
 I wish there had been something like this when I was in school. It's such a great concept and it can save you money on the cost of books!  
  The website is called :

Buying your books can be such a huge cost when you're going to school. 
 So here are just a few of the perks of renting your books from CampusBookRentals.com:
-Save 40-90% off of bookstore prices!
-Free Shipping both ways!
-You can search your book by Author, Title, Keyword or ISBN
-You are able to highlight in the textbooks!
-They have flexible renting periods!
-They give you a 30 day risk free guarantee!

And my favorite part....
-They donate to Operation Smile with each textbook rented! 
They have committed to donating enough to cover a minimum of 1,000 life changing surgeries and hope to beat that number!

So go check out their website now!
You can also find them on Facebook HERE!

Thursday, May 10, 2012

Adding A Touch of "GREEN"

Another thing that I love to decorate with is greenery or plants.  
If you notice, mine aren't real...I'm not too good at keeping them alive!
I just put a decorative ball on top of a candle stick & tied a bow around it.  

I think the green plant completed the look on my lamp table...remember how I love to decorate with birds too!
In my great room I added put some greenery on a plant stand in the corner...

This topiary plant add a little color to my mantel....


I added a grass box to the top of our piano.

I added a green wreath to my mirror above the couch in the living room...
I placed a wreath around the rooster on my dining room table...
A little more green in my dining/great room area...
 I think a little bit of green adds a lot.  
What do you like to decorate with??

Then when I was taking pictures, I told my boys to move from the table so I could clean up our lunch  & take a few more pictures.  Then one of my boys said, "I know mom take a picture while it's messy & then take one after you clean up...it can be a before & after picture!" 
 Oh no, I think this blogging thing must be wearing off on them!
So here they are...
BEFORE

Tuesday, May 1, 2012

Magazine Holder...

I love any decor that has birds on it!
I've used them in my living room, my daughter's nursery & in my kitchen.  

Today I was shopping at T.J. Maxx & found these adorable paper magazine holders.
 I fell in love because they had a cute saying & they were decorated with birds.  
I loved the price too, only $5.99!  
It says, "Do What Makes Your Heart Smile".

I added a few flowers & some magazines & placed them by the love seat in my room.
It looks kind of "springy" too!  
Cute & functional, my favorite kind of decorating!
If you'd like to see the changes we've made to our master bedroom over the years, you can see it HERE.
This couch actually used to be red...I used a slipcover to make it white!
I'm sharing with these blogs:

Saturday, April 21, 2012

Outdoor Lighting

Last Summer, we wanted to add some extra outdoor lighting to our deck.  
We didn't have a lot of money to spend & found an inexpensive & easy way to do it.  
I love the look of the post lights that are attached right onto a deck, so we tried to create this look on a very small budget.

We actually just bought a box of Outdoor Solar LED Walk Path Lights like this from Home Depot.
The box cost us about $20.00 for six.

We just didn't attach the posts that go into the ground.  Then my husband just took a drill & regular wood screws & drilled the base of the lights right into the deck.  Then we placed the decorative tops back on.
These are solar lights so no electrical work had to be done!

Here is how it looks at night...
It adds a nice extra "glow" when I look out my back window!
 I really love how they turned out!
So we tried our best to pick some that matched the light fixture attached to our house.
It's an easy way to add some extra light for those summer nights!
Now I can't wait to get out all of my deck furniture & flower pots!

Friday, April 13, 2012

Death By Chocolate {RECIPE}


This is one of my family's favorite desserts!
My nephew ALWAYS requests this for family parties.  

1 (9x13 inch) pan cooked brownies, cut into small pieces.
2 (3 oz.) boxes instant chocolate pudding, prepared.
2 (8 oz.) chocolate cool whip 
*I use regular flavor...the chocolate was too rich for us.
2 Skor toffee bars, crushed 
*I used Oreos or you could use any candy bar of your choice.

In a large trifle bowl or glass dish....
LAYER
1/2 pudding mixture
1/2 brownies
1 (8 oz.) Cool Whip
Crushed candy bar, sprinkled
REPEAT
1/2 pudding mixture
1/2 brownies
1 (8 oz.) Cool Whip
Crushed candy bar, sprinkled
Refrigerate at least 4 hours before serving.

Thursday, April 5, 2012

Easy Decorated Banner Cake


I LOVE banners lately!  
I had to bring a cake to a party a few weeks ago & wanted to make a paper banner to decorate it with.
I found a wonderful tutorial on Pinterest.  It came from the blog A Contented Common Life.

I made my banner & then used some flowers to decorate the rest of the cake with.
 I really think it turned out cute !
The nice thing is you can use all of the decorations again for another time!

I loved how easy the banner was to make.... 
So I  decided to make a larger one for my Easter Decor in my entry way.

Happy Easter!!

I'm sharing with these blogs: