Friday, December 14, 2012

Christmas In The Entryway...

 I just kept it real simple this year.

 I used the same glass jar that was used for my Fall Decor.
  I just added a red bow & changed the candy corn for some ornaments.

 Then I swapped out the orange flowers for some white ones.

Then I took a dollar store gift bag & framed it...
I love how it turned out! 
 It is such a cheap & easy way to get prints for the different holidays!
Last year, I used a bag that had a Christmas Tree.

Sunday, December 9, 2012

Family Favorite...Orange Jello Salad

This is always a hit at a party or BBQ! 
Next to my Oreo Cookies, this is the most requested item for me to bring for a party.
 It makes a large bowl,which is nice when you are serving a larger crowd.  
You'll always bring home an empty bowl...It's really good!

These are the ingredients you'll need:
3 boxes Tapioca Cook & Serve Jello Pudding
1 Large box Vanilla Cook & Serve Pudding
1 Large box of Orange Jello
2 (15 ounce) Cans of Mandarin Oranges (drained)
1 container Cool Whip (thawed)

Boil 6 cups of water & add your Tapioca pudding, Vanilla pudding & Orange Jello.
Stir constantly for about 5 minutes.
Let cool a little...


 Then pour into a bowl (I use a big Tupperware bowl with a lid).
Put in fridge for 6 hours or Overnight.

Then mix in the Thawed Cool Whip & Drained Mandarin Oranges.

Enjoy!!
 It is YUMMY!!
I'm sharing with these blogs:
Savvy Southern Style
52 Mantels
Flamingo Toes
Craftomaniac
Sumo's Sweet Stuff

Wednesday, December 5, 2012

"O Christmas Tree"

Our tree isn't a whole lot different than last year, but for some reason it was hard to get it to look right!
It could of been that I had 4 "extra" helpers for this one & the two boys couldn't wait to get the train up & were always right under my feet!  
Their excitement is contagious though & it is fun to make memories together!
Here it is...
I always stick with a red & white color scheme for this tree.
 I added our initial's that I made last year again...
You can see how I made them HERE.
 I always love my peppermint candy ornaments too!

 Our Merry Christmas block adds some color & fun to the tree!
 Once again, I used my snowflakes from the dollar store & our Christmas gift light!
 Our star was not staying up, so I just put a big snowflake...it kind of looks like a star!
Here is a shot of the corner of the room...
Merry Christmas!
You can see our other Christmas Decorations HERE & HERE
Sharing with these blogs:
The 36th Avenue
Tatertots & Jello
DIY Showoff
Savvy Southern Style
Thrifty Decor Chick

Friday, November 30, 2012

Our "NOEL" Staircase...

I changed our staircase a little this year...
I added some "Noel" letters that I made.  
I really like how they turned out!
I just added red & white scrapbook paper to some wood letters that I got from Hobby Lobby.
Then I just traced the letters onto the paper.
Cut them out.
I added a layer of  Mod Podge to the letters & stuck the paper on.  
Once they dried I put another layer over the top.
Then I actually put some Command Strip hooks on the back...I just hung them upside down so my wire would hook underneath & wrap around my railings. 
It worked great!

I did keep two of the wreaths that I used last year...One at the top of the staircase & one at the bottom.
It was a fun change & I like the pop of red & white color!

Here is last year's staircase...
AND
One more time....
This year!
We are almost finished decorating, I'll be showing our tree next!
I'm sharing with these blogs:
Flamingo Toes
Thrifty Decor Chick
Home Stories A to Z
The 36th Avenue
52 Mantels
Tatertots & Jello
Organize & Decorate Everything
DIY Showoff

Wednesday, November 28, 2012

Christmas In The Family Room....

It's beginning to feel a lot like Christmas at our house.
Outside it's been feeling like Spring, so It's been hard to find the "spirit" to pull out all of our Christmas decor.  
It could also be this little cutie...
She really likes to help, which means it takes twice as long to put back what she pulls down!
It's been exhausting, but luckily she chilled on the couch for a few minutes to watch Dora The Explorer!! 
 It was a Christmas Miracle!!

Here's our Family Room Mantle....
 It's a little different than last year, but we couldn't put up our Santa's because the little cutie above was traumatized by a real Santa at the mall this weekend...It was so sad!

 I always keep our small tree "simple"...

 I love wreaths!

These cute block letters were given to me by my sweet sister-in-law last year...She made them & they turned out so cute!
I love my big snowflakes from the dollar store...
 My Nativity....
It was a gift from my Parent's years ago & I just love it!
Here is the whole room...
It's finally done, but now I have a HUGE mess in my basement to clean!
Christmas decorating is hard work, but it's so cozy when you FINALLY finish!!
I'm sharing with these blogs:

Sunday, November 18, 2012

Cleaning & Sealing Travertine Tile

We added Travertine Tile to our entry, kitchen & laundry room about 6 years ago.  
Unfortunately, the grout has gotten pretty gross over the years...it's actually turned black!  
I guess we were suppose to be sealing it every year & we never had.
I couldn't stand it anymore, so I decided to see if I could clean the grout myself...Amazingly it worked!!

HOW TO CLEAN THE TILE...

I started with these supplies...
Comet, A spray bottle filled with warm water & a textured rag.

I started by shaking some comet onto the black grout, then I sprayed the water onto that & it kind of made a paste.  Just scrub with the rag.  I'm sure a toothbrush would work too, but my rag really got it off!
Then I sprayed more water & wiped it all off. 
 I was really surprised!
This did take some time & I actually worked on it a few days, but it was so worth it!!
I just did small sections at a time.
After I finished cleaning all of the grout, I mopped the floor twice before I applied the sealer.  

APPLYING THE SEALER...
After the floor is completely dry I used this sealer from Home Depot.

Then I used a small smooth roller & a disposable paint tray.
 
A little bit goes a long way, so I just poured a small amount of  sealer at a time.

 I just did a few rows of tile at a time.  
You just roll it all over the tile & grout.    
Then you let it sit for 3-5 minutes & wipe it off with a clean white towel.  

It's amazing how a few supplies can make such a difference!

I wish I hadn't waited so long to seal the floors...it wasn't as hard as I thought!
I'm sharing with these blogs:
My Uncommon Slice Of Suburbia
Home Stories A to Z
Chic On A Shoestring
Making The World Cuter
The 36th Avenue

Wednesday, November 7, 2012

Thanksgiving Decor...

I was so excited to put up our Halloween decorations, but I was just as excited to put it away this year! 
Once I started cleaning it all up,I was ready to put away all of my Fall decor!

I just left a few things out...
I put up my "Happy Thanksgiving" sign & put a pumpkin under it.

 This is the table in my entry/living room.
You can see how I made my initial plaque for about $3 HERE.
I changed the "Happy Halloween" sign to a "Give Thanks" sign on my wreath.

My porch all lit up at night...it gets dark so early now! :(

 Here is one of my shelves in the family room.  
I went simple because before you know it....we'll be pulling out the Christmas Decor!!

Wednesday, October 24, 2012

Garage Doors...

I am totally in love with houses that have  "character".  
We are slowly trying to add elements to our house that add some charm.  
We've changed our lighting, painted the exterior & added wood shutters. I think all of the changes have made a huge difference.
You can see the first set of changes HERE.
I've been wanting to add some hardware to our garage doors for a while now.
Our doors are actually kind of old & when we were at Home Depot the other night, we decided to get some pricing for new ones. 
I am totally in LOVE with the carriage garage doors!
Unfortunately, they are not in our budget right now & they can be REALLY expensive! 

Here are a few inspiration photos...
cottage style...love the wood work above garage 
grey and white exterior. 


Aren't they charming??
Well considering we have plenty of other projects that I'd like to save our money for (Like a white kitchen!) 
We decided to just buy the hardware and at $12.50 a package, It's a cheap way to add some charm!  
We had to buy two packages to fit both of our doors.
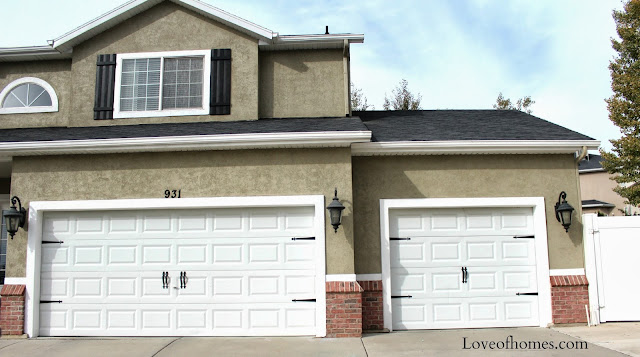
My husband & boys started on the third car garage & I was SO excited with how it was looking...

Charming wouldn't you say?
It was just the look I was hoping for!
Then we got to the main garage door & there was a problem...it actually had a thinner width in the middle part of the door for the handles.
They both wouldn't fit side by side like the other door!!
 The only choice we had was to place them spaced apart & we couldn't change the 3rd car garage door to match because we had already drilled the holes in the middle.
My husband says it's fine because they are two different sized doors.
I'm still not sure.

Do you think it is OK to have them a little different?
Any suggestions on how we could fix it?
I think they are a terrific & cheap way to add some character, but if you have two doors always make sure they are actually the same size before you start!
****UPDATE
It drove me crazy to have the doors look so different!
It's only a year later, but I did figure out how to fix my doors!
I bought one more package of door hardware & moved the handles in.
 I decided to place two sets of double handles closer together like the other door.  We filled the holes in with screws & painted them white...you hardly notice them at all.
They definitely match better now!
 I'm sharing with these blogs:
The 36th Avenue
Fine Craft Guild
Fireflies & Jellybeans
Kristen's Creations
Redoux
Chic On A Shoestring
Tatertots & Jello
Craftomaniac
Making The World Cuter
Cherished Bliss
My Uncommon Slice Of Suburbia
The Sasse Life
Finding Fabulous
Skip To My Lou
Thrifty Decor Chick
Beneath My Heart
I Heart Nap Time
Organize & Decorate Everything